Well it is that time of the month, where I get to make cheese. I get to create, try new things, try to not get divorced over the mess I tend to make (my wife tends to stay out of the Kitchen when I am making cheese, this time it was for the best). I am getting better at cleaning up after myself, and sanitation is the key to cheese that is good to eat and not cheese to make you sick.
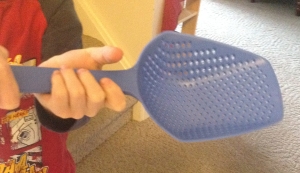
First thing I wanted to talk about is my new toy. I was at a dollar store, I always look for containers that I can turn into moulds, and I saw this “pasta strainer scoop”, and I figured I could use this for cheese making. Let me tell you it was the bes $1.25 I have spent on cheese making equipment. It was great in scooping out curd for my experiment (more on that later) and for stirring the curd while I was in the “cooking” phase of making the Cheddar. And when I was ladling out the curd to drain it was awesome, and I did not get whey all over the Kitchen.

I know what you are thinking, gee doesn’t that look like a scoop for kitty litter…ewww, how could you use that?!?
The Scoop of Cheese Making AwesomenessRest assured it is food safe and the package said pasta strainer scoop, and it was in the aisle that had all the other food prep items. It really did the trick and I will now use it with all my cheese making.
Now that I have raved about my toy, it is now time to talk about actually making cheese. I thought that it would be nice to make a Cheddar for my Son, that we will open when he is 8 years old (he turns 7 next week), but I wanted to do something for myself. I figured I could use 1/4 the curd for me and the rest for his cheddar. So from one vat I would get two cheeses.
Here goes the make:
It was a balmy Spring day in Alberta’s Capital City…..ok back to reality.
Ingriedients
14 L “Fresh” Milk – Jersey
5 Frozen Cubes of Mother Culture made from Probat 222
2 tbsp of Pickling Salt
1/4 tsp rennet in 1/4 cup distilled water.

After boiling and sanitizing everything I added my 14L of milk to my trusty roaster vat that I have come to use for about 95% of my makes. I then heated the milk slowly to 88F/31C and added my cubes of culture and let ripen for 45 minutes. (I don’t have a pH meter, but it is on my list) Then I added my diluted rennet mix to the vat and stirred in the usual up down method, with some top stirring for good luck.
I then, using the flocculation method, I had a time of 10 minutes for the milk surface to gel, then I used a multiplier of 3.5 and arrived at a cut time of 35 minutes from adding the rennet. (I like this method and I will make a post about it at a later time.) So I waited, and watched episodes of Cheese Slices on my iPad. By this time my son came home from school and he wanted to cut the curd.

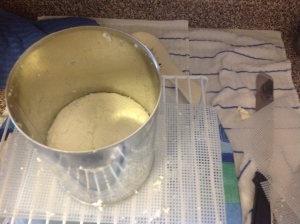
He is a great help, I cut the curd width wise, and he cut it length wise. I then let the curd rest for almost 10 minutes, and took the bottom quarter, and using the strainer scoop, ladled curd into an improvised hoop to drain under it’s own weight, just like you would drain a Camembert, it was a bit of a disaster at first. I learned that my hoop should have some drainage holes on the sides, that you should not move the hoop right away or everything will run out into the container you have underneath the rack you are draining on. It was quite a mess, that I did clean up and moved on. I took the curd that went into the draining container and put them back into the hoop and carefully moved it to the side to drain.

I waited about 30 minutes and then attempted a a flip and then every 30 minutes afterwards until it was time to relax for the evening and I removed it from the hoop and let it drain out in the open. It has reduced in size by quite a bit. This is the first time I have attempted to do something like this, hopefully it turns out, as I have some special plans for this little one.
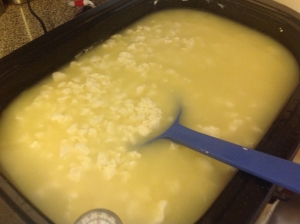
After this I continued to heat the curd slowly over the next 40 minutes to 102F/38C and stirred the curd gently with my new scoop during this time and let the curd reduce in size by expelling whey. It was actually quite relaxing, then came the draining and then the cheddaring.

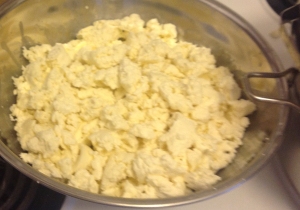
As I said before, next came the Cheddaring, I used a different method this time. Normally I would stack my slabs of curd back into the vat and flip and stack and drain. This time they stayed in the colander and I placed it over a pot of war whey and put a lid on it. I flipped and stacked every 10 minutes for 1 hour. I ended up with my slab of curd that looked like poached chicken. Not really appealing but so far so good.


Now the next step was to mill or break this slab up into smaller pieces. Most recipes will say to cut them up into strips similar to french fries, but after looking at how some of the creameries do it (thanks to the Cheese Slices episode on cheddar) I chose to break it up by hand, trying to make it look like it had been through a peg mill. It then salted it and put it into the press. I pressed a medium pressure for 1 hour and then flipped, redressed the cheese cloth and pressed under heavy pressure for 12 hours.
I did not get a picture of the curd going into the press as I was busy and in the moment. I did how ever get a picture of the cheese the next day after it cam out of the press. I think this could be my best cheddar yet. It will air dry for a few days, then to the cave for about a week or two, then depending on the rind, possibly vacuum sealed for the year. (Ian does not wax, or lard) The little one is going to get rubbed/washed with scotch. I have hear of the Bishop Kennedy Cheese made in Scotland that is done this way. This probably won’t be as good, but one can hope.


It has been an interesting experience and I will let you know how things progress. Go out and make some cheese, or at least eat some.
Cheers

Those are beautiful cheeses! Great color and shape and nice rind already. I love that you’re making it for your son’s birthday. Can’t wait to see how these turn out!
Thank you, I made a Cheddar for my daughter’s first birthday two months before she was born. I thought it fair that he had a cheese too. He picked the type and I said I would make it. It was his idea to wait until his eighth birthday. I think if we do it right we should be eating the last quarter of the cheese when he is 12. Yeah right
Awesome! I will have to try this. I’m thinking Irish whiskey would be a great rub also.
Thank you, I was debating on what to use, I had the choice of another beer wash (I’ve done that and I am working on “perfecting” that one), or the other two in my cupboard Kahlua, or Scotch. Some how I was thinking that Kahlua would not work, but that might be for another day.
Kahlua may be good! Ever have barely buzzed cheddar?
No I haven’t but I looked it up. I think I will have to see if my cheese monger has some, if they do I think I will have to get some.
I love the idea of the roaster for the vat. I am still struggling with the pot in the sink of hot water. Do you have any problems warming slow enough with the roaster? What brand is yours? I am going to try this cheddar this weekend with my “fresh” milk. I haven’t tried cheddar yet. Been to chicken. It looks pretty easy the way you show it so what the heck! :0)
I love my roaster vat, it took me 3 dry runs, using water instead of milk, I made marks on the dial to show me where to set the temperature. I use a Rival Brand roaster, it has a 14L insert that goes in it. I put about 2 cups of boiling water from the kettle in the main compartment and then put the insert in, then the milk. Cheddar is kind of straight forward, this was my third one, it is just very time consuming. I started at about 1:30 PM and finally got something into the press about 5:30 PM, it will be worth the effort in a years time when we open it. One more thing about the roaster, try to get a used one, if you make it into a water bath you will void the warranty of a new one. Mine was given to me by my sister-in-law, who did not use hers any more.
Well I made my first cheddar today. I had a really hard time keeping the temperature right with the hot water bath in my sink. It was a few degrees too warm for most of the time. I have it in my 4 lb. Kadova mold that I use for gouda and I have a breadboard and a 21 lb. weight on the top of it. I worked up the weight by increments of (6,9,12,15,18,21) every 20 minutes or so and flipping the cheese every 2nd time. Keeping my fingers crossed that when I go to bed, which is shortly, it won’t tilt to one side on me. I have it proped up fairly well so hopefully not. What do you press with. I know you said you got the hardwood press from Glengarry this past year but what have you been using up to now? I am using a dumbbell that can go from 6 to 21 lbs. It works but on top of the Kadova mold it is a little tippy.
When I first started I was making small cheeses and using margarine tubs as moulds, and I would take my free weights, wrap them in plastic wrap and place them on top. I usually got very under pressed cheeses. I received my press Christmas of 2010 so it has been almost 2 years now of using it. I know of someone on from New Zealand who uses his kids lego/duplo to steady his cheese moulds. I use a cutting board with the pressing of my Mini Cheeses (my version of baby bels) it seems to work. I would like to upgrade to a Dutch Press, there are plenty of places you can get the plans for them. I am not really a handy kind of guy, but I am learning, I am thinking I may make one.
Have you tried a large stock pot on the stove and set your cheese pot inside? I have an electric stove so there is some heat carry over, but I have been told by others who use gas that it is easy to control the temperature. I am envious of your Kadova mold, I want one, but I can’t justify the price right now.
Let me know how cheese turned out.